
GC Home | Register | Shop | Learn | Business | Around Town | Info
The waistband pattern in commercial patterns rarely fits just the way you want it to, and the side seams are rarely in the proper position. These instructions provide the following:
Details for making a waistband pattern that fits comfortably just the way you want it to fit with the side seams in the proper position.
Directions for applying a lightweight non-roll stabilizer that is used in the ready-to-wear industry.
Efficient construction techniques that reduce bulk.
Encouragement to customize instructions to meet your needs.
The stabilizer is available in 1" and 1 1/4" widths. It is preferable to use snaps or skirt hooks as closures with this stabilizer rather than buttons and buttonholes.
Make the waistband pattern:
Pin the waistband stabilizer around your waist without cutting it. Move and bend and adjust the stabilizer until it is comfortable. Mark the exact length. Measure the stabilizer to determine your waist measurement. (Do not cut the stabilizer until after stitching it to the garment.) Look in a mirror or have a fitting buddy help to determine where the side seams should fall. If you're not sure about where the seams should fall, wear a skirt or pants that have the side seam in a pleasing position. Measure from side seam to side seam across the front. Most of us are a bit bigger across the front than across the back. It's important to take this into consideration, otherwise the side seams of the skirt or pants will not hang perpendicular to the floor.
Draw the waistband pattern on paper or directly on the fabric. (I find it more efficient to work directly on the fabric using a wide ruler for marking. (Since my weight doesn't remain constant, I take my measurements each time I make a garment and make it to fit me that day.)
Length: Length equals the desired finished length (the length of the stabilizer) plus 5". The extra 5" allows for seam allowances and an extension on both ends. The excess will be cut off later.)
Width: For the 1" stabilizer, width equals 3 1/8". For the 1 1/4" stabilizer, width equals 3 5/8".
The formula is: Width equals two times the width of the stabilizer plus width of seam allowance plus 1/2". This is a good place to practice using a 1/2" seam allowance rather than 5/8". Use the formula to calculate the width of the waistband and adjust the seam allowance on the waist of the garment to 1/2".
Cut the waistband: If you have enough fabric, cut the waistband with the longest edge parallel to the selvage for greater stability. Place one edge on the selvage to provide a finished edge. If there isn't enough fabric to cut on the selvage, serge finish or bind one edge.
Mark the waistband: For a center back opening, fold waistband in half. Mark center front with a 1/8" clip into the non-selvage or unfinished edge. Mark side seams by dividing the front side to side waist measurement by 2. Measure this amount from center front on each side. Mark these points with clips. Mark center back by dividing the total waist measurement by 2. Measure this amount from center front on each side. Mark these points with clips. For a center front or side opening, adjust markings on waistband accordingly. Note that there will be 2 1/2" of excess fabric on both ends of the waistband.

Apply
the waistband to the garment: Place waistline of garment and non-selvage
or unfinished edge of the waistband together with right sides together. Match
and pin center back, center front, and side seams. The waistline of the garment
should be at least 1" larger than the waistband with 1/4" ease
distributed in each quarter section. Ease the excess onto the waistband. If
there is more or less than 1" ease in the garment, adjust the side seams,
darts, or pleats to provide that 1/4" difference. Stitch waistband to
garment. Use whatever seam allowance you allowed on the pattern. Leave the
excess fabric free at both ends. Stitch with waistband on top to allow the feed
dogs to ease in the excess fabric in the garment. Figure
A.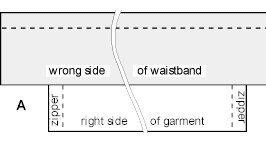
Place the stabilizer (still uncut) on top of the seam allowance just against the stitching line. To allow for an extension (or underlay) begin the stabilizer 11/2" to 2" in front of the edge of the garment. (This is the extension or underlay) Stitch through the stabilizer anywhere within the seam allowance. When you are an inch or so from the end, cut the stabilizer so it is flush with the edge of the garment. Figures B and C.
|
|
|
At each end, fold waistband back on itself at the edge of the stabilizer with right sides together. Fold seam allowance of garment and waistband up into the waistband. The seam allowance of the unstitched edge of the waistband hangs free. Do not fold it up. Stitch ends right next to the stabilizer. Trim seam allowances at the ends to 3/8". Figure D.
Option: To make stitching in the ditch easier, press paper-backed double faced fusible tape to the seam allowance. Do not remove the paper at this time. Figure E.
|
|
|
At each end, fold seam allowance back over the stabilizer and hold in place carefully while turning. On the extension end, tuck the selvage edge under and fold the seam allowance of the long seam over the seam allowance of the short seam. (There are two ways of turning the selvage edge. By trying it both ways, you will quickly see which way is the best.)
Remove the paper from the fusible tape. Fold waistband tightly over the stabilizer. Turn the seam allowance under on the extension only. Clip into the stitching line on the waistband at the end of the extension and pull the edge of the waistband down. At the other end, tuck the seam allowance up to form a tiny miter. Press in place or, if you are not using the tape, pin. The underside of the waistband will extend 3/8" to 1/2" beyond the seam. From the right side, stitch in the well of the seam. Figures F and G.
|
|
|
Add skirt hooks or snaps.
Judy Barlup is a popular speaker who is known for her enthusiasm and love of teaching. She produced the video "Japanese Tailoring", appears as a guest on HGTV's Sew Perfect, is a writer and owner of Unique Techniques, a business dedicated to bringing innovative and unique techniques to the world of sewing.
More information on Unique Techniques
Back to the Get Creative! Conference Center
Back to Meet the Get Creative! Experts
|
GetCreativeShow.com
| [email protected]
www.GetCreativeShow.com
Advertisers & Virtual Advantage Web Design Clients |
||
|
SEWING
& QUILTING: A Stitch in Time Quilting Abby's Attic Quilting & Fabric Blossom Quiltworks Buggy Barn Quilts Carriage Country Quilts Charlotte's Sew Natural Cozy Kitten Quilts Deborah Gayle Sales Flamingo Island Designs LLC Fat Quarter Quilters Front Porch Quilts GreatPond Quilts LLC Grandmas Attic Quilting Judy's Barlup's Unique Techniques Karen's Kreations Let's Quilt Liberty Quilt Shop Londa's Sewing LS Boudreau Quilt Fabric Store Mendon Village Muggin's Designer Hats My
Quilt Shoppe
|
SEWING
& QUILTING: Quilting Search Quiltmakers Quilt Shop Quilts by the Bay SAF-T-POCKETS Sewing Gallery Sew Bee It Sew Many Options Tours Silhouette Patterns Stacey's Quilty Conscience Sundrop Textiles Sunflower Quilts Suzanne's Quilt Shop Texas Quiltworks The Quilting Circle The Quilted Crow Tiny Stitches Weather or Not Fabrics VA Quilt Shops Virtual Advantage Quilt Shop Resource VonZensenburg Quilts York Street Quilting Co. CRAFTS
& NEEDLEWORK: |
OTHER
VA CLIENTS: BC Holstein News Cedarland Forest Products Clearbrook Brewing Davit Systems Demo GoldenSilencer.com Silencer Products Int. Heat Safe Industries Kodiak Ranch Lake Tahoe House Rental BC Fishing Resorts BC Fishing Directory BC Fishing Derby Resource BC Sport Fish, BC Sport Fishing Salmon Sports BC Fishing BajaSportFishing Cabo Sportfishing Tide Exchange Beachcombers Marina Kaslo Bay Resort & Condo Dev Mary's Gunns Riverside Golf Highland Powder Skiing Blackfish Marine Blackfish Desert Race Baja 1000 Fairview Electrolysis RealEstateBuySell Silva Panel S'more Camping Please Lighting Store.ca Coast Spas
|


